WPF Custom RoutedUICommand 사용방법
2024. 7. 14. 20:59
반응형

WPF Custom RoutedUICommand 사용방법
RoutedUICommand는 WPF 애플리케이션에서 재사용 가능한 명령을 정의하는 데 유용합니다.
RoutedUICommand 를 이용해 키이벤트를 받아서 처리하는 방법을 알아봅니다.
아래는 키보드 Ctrl + e 를 누르면 동작하도록 하는 예시입니다.
1. Custom RoutedUICommand 정의
먼저 새로운 RoutedUICommand를 정의합니다.
using System.Windows.Input;

namespace WPFTest
{
    public static class CustomCommands
    {
        public static readonly RoutedUICommand ExampleCommand = new RoutedUICommand(
            "Example Command",  // 명령의 텍스트
            "ExampleCommand",   // 명령의 이름
            typeof(CustomCommands), // 명령이 정의된 타입
            new InputGestureCollection() // 단축키
            {
            new KeyGesture(Key.E, ModifierKeys.Control)
            }
        );
    }
}
2. XAML에서 Command 바인딩
정의한 Command를 XAML에서 사용합니다.
<Window
    x:Class="WPFTest.MainWindow"
    xmlns="http://schemas.microsoft.com/winfx/2006/xaml/presentation"
    xmlns:x="http://schemas.microsoft.com/winfx/2006/xaml"
    xmlns:d="http://schemas.microsoft.com/expression/blend/2008"
    xmlns:local="clr-namespace:WPFTest"
    xmlns:mc="http://schemas.openxmlformats.org/markup-compatibility/2006"
    Title="MainWindow"
    Width="800"
    Height="450"
    mc:Ignorable="d">
    <Window.CommandBindings>
        <CommandBinding
            CanExecute="ExampleCommand_CanExecute"
            Command="{x:Static local:CustomCommands.ExampleCommand}"
            Executed="ExampleCommand_Executed" />
    </Window.CommandBindings>

    <Button Command="{x:Static local:CustomCommands.ExampleCommand}" Content="Example Command" />
</Window>
3. 코드 비하인드에서 Command 핸들러 구현
Command의 실행 로직과 실행 가능 여부를 결정하는 메서드를 구현합니다.
using System.Windows;
using System.Windows.Input;
namespace WPFTest
{
/// <summary>
/// Interaction logic for MainWindow.xaml
/// </summary>
public partial class MainWindow : Window
{
public MainWindow()
{
InitializeComponent();
}
private void ExampleCommand_Executed(object sender, ExecutedRoutedEventArgs e)
{
MessageBox.Show("Example Command Executed!");
}
private void ExampleCommand_CanExecute(object sender, CanExecuteRoutedEventArgs e)
{
e.CanExecute = true; // 명령 실행 가능 여부를 결정하는 로직
}
}
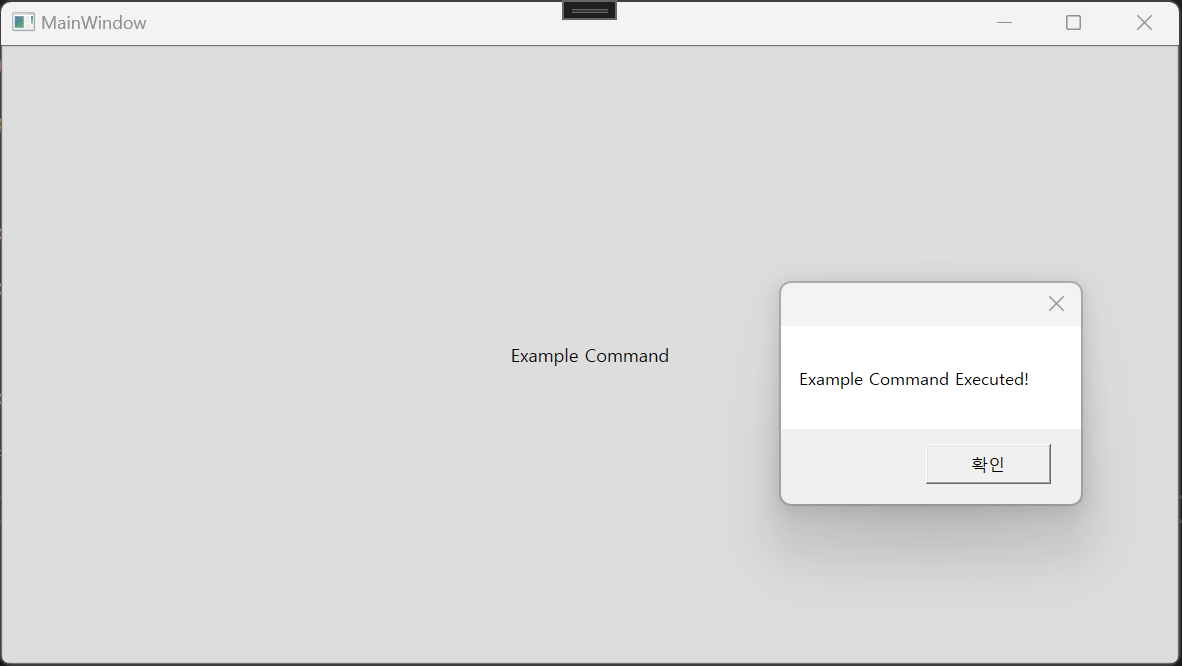
}Ctrl+e 키를 동시에 누르면 아래와 같이 팝업 메세지가 나타나게됩니다.
결과
이 방식의 장점
재사용성: 여러 컨트롤에서 동일한 Command를 사용할 수 있습니다.
중앙 집중화: Command 로직을 한 곳에서 관리할 수 있습니다.
단축키 지원: InputGestureCollection을 통해 쉽게 단축키를 정의할 수 있습니다.
반응형
'코딩 > WPF' 카테고리의 다른 글
| WPF PageFunction 사용방법 (0) | 2024.07.15 |
|---|---|
| WPF 기초 - ContextMenu 사용하기 (0) | 2024.07.15 |
| WPF TextBox 줄바꿈(개행) 처리 (0) | 2024.07.14 |
| WPF Custom FrameworkElement 사용하기 (0) | 2024.07.10 |
| WPF IValueConverter 사용하기 (0) | 2024.07.10 |